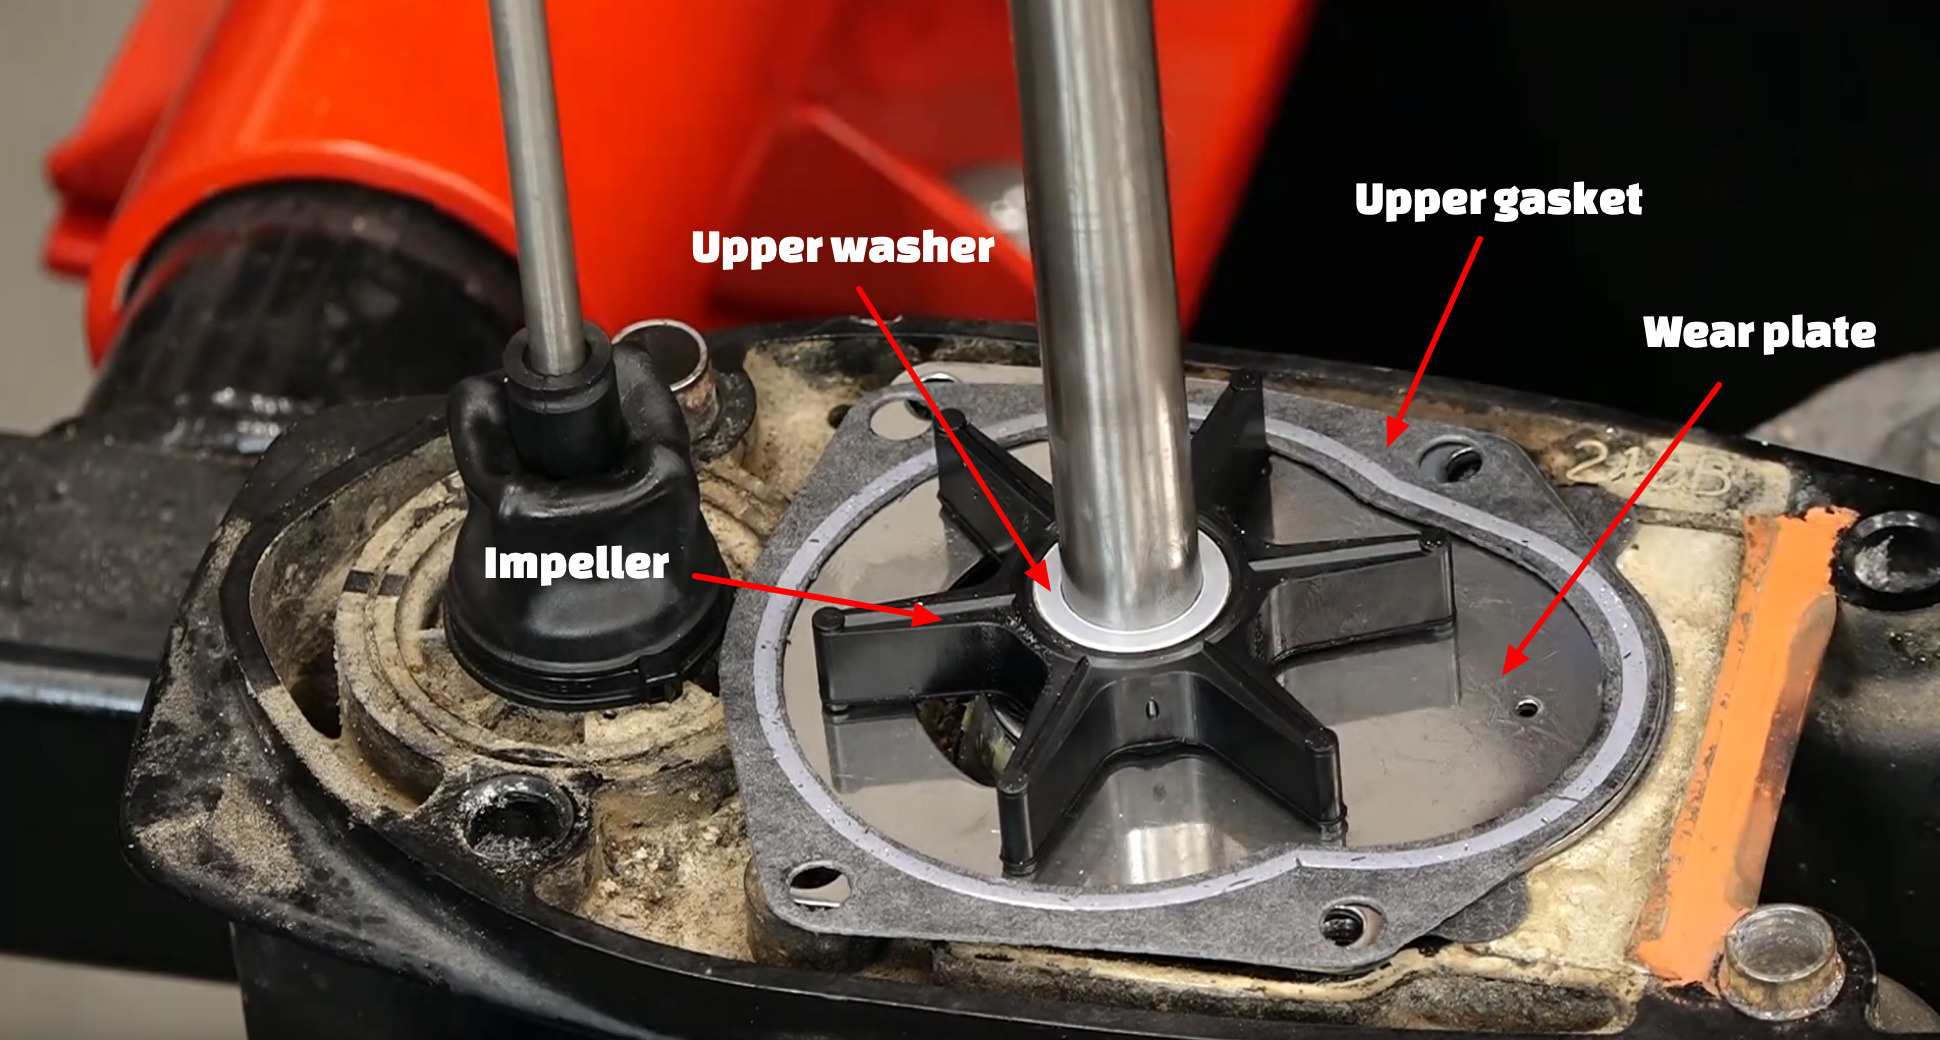
Is your Suzuki outboard overheating? A failing impeller might be the culprit. This critical component pumps water through your engine to keep it cool, and a worn-out impeller can lead to serious damage. Fortunately, replacing a Suzuki outboard impeller is a manageable DIY task that can save you significant money compared to a professional service. This guide will walk you through everything you need to know.
The impeller is a small, rubber component located within the lower unit of your outboard. It spins rapidly, creating suction that draws water in and pushes it through the cooling system. Over time, the impeller vanes can wear down, crack, or become damaged due to debris, leading to reduced cooling efficiency. Neglecting a failing impeller can result in overheating, potentially causing severe damage to your engine.
The history of impeller-driven cooling systems in outboards goes hand in hand with the development of more powerful engines. As outboards became larger and generated more heat, the need for efficient cooling became paramount. Impellers provided a compact and effective solution. Today, they are a standard component in virtually all outboard motors.
Knowing how to replace your Suzuki outboard impeller is essential for any boat owner. It's a preventative maintenance task that can significantly extend the life of your engine. By regularly inspecting and replacing your impeller, you can avoid costly repairs and ensure your outboard stays in top condition. Regular impeller replacement is arguably as important as regular oil changes.
Signs of a failing impeller can include overheating, a weak telltale stream (the small stream of water that indicates the cooling system is working), steam coming from the engine, or a high-temperature alarm. If you notice any of these symptoms, it's crucial to inspect and potentially replace your impeller promptly.
Benefits of a properly functioning and regularly replaced impeller include: preventing overheating and engine damage, ensuring optimal engine performance, and extending the life of your outboard.
Action Plan for Impeller Replacement:
1. Gather your tools and materials: a new impeller kit (specific to your Suzuki outboard model), a lower unit oil drain pan, a wrench set, screwdrivers, and lubricant.
2. Disconnect the fuel line and battery cables.
3. Drain the lower unit oil.
4. Remove the lower unit from the outboard.
5. Locate and remove the old impeller housing.
6. Install the new impeller, ensuring it's seated correctly within the housing.
7. Reassemble the lower unit, refill with oil, and reconnect everything.Checklist:
New impeller kit, Lower unit oil, Drain pan, Wrenches, Screwdrivers, Lubricant, Shop manual (for specific torque specifications)
Advantages and Disadvantages of DIY Impeller Replacement
| Advantages | Disadvantages |
|---|---|
| Cost savings compared to professional service. | Potential for mistakes if not familiar with the process. |
| Increased knowledge and understanding of your outboard. | Time commitment required. |
| Convenience of performing the task at your own pace and schedule. | Need for specialized tools in some cases. |
Best Practices: Always use the correct impeller for your specific Suzuki outboard model. Lubricate the new impeller before installation. Torque all bolts to the manufacturer's specifications. Inspect the impeller housing for any damage or wear. Replace the lower unit oil with the correct type and quantity.
FAQs
How often should I replace my impeller? - Generally, every 1-2 years or more frequently in harsh operating conditions.
Can I use any impeller? - No, use only the correct impeller for your Suzuki outboard model.
What happens if I don't replace my impeller? - Engine overheating and potentially severe damage.
Is it difficult to replace an impeller? - It's a moderately challenging DIY task.
Do I need special tools? - Basic hand tools and potentially a few specialized tools depending on the model.
Where can I buy an impeller kit? - Marine supply stores, online retailers, and authorized Suzuki dealers.
Can I reuse the old impeller housing? - Yes, usually, unless it's damaged.
What type of lubricant should I use? - Water pump lubricant or glycerin.
Tips and Tricks: Take photos as you disassemble the lower unit to help with reassembly. Use a small screwdriver or pick to carefully remove the old impeller. Inspect the old impeller for clues about potential problems (e.g., debris indicating a damaged water intake).
Replacing your Suzuki outboard impeller is a crucial maintenance task that can save you from costly repairs and ensure your engine runs smoothly for years to come. While it might seem daunting at first, with the right tools, information, and a little patience, it's a manageable DIY project. By understanding the importance of a healthy impeller, recognizing the signs of a failing one, and following the steps outlined in this guide, you can keep your Suzuki outboard performing at its best. Don't wait for an overheating emergency – be proactive and take control of your outboard's health today. Investing the time and effort in regular impeller maintenance will pay off in the long run by ensuring reliable performance and avoiding potentially catastrophic engine failure. Take action now and enjoy worry-free boating.
Finding your perfect pre owned toyota rav4 hybrid in ontario
Unveiling james p sullivan a deep dive into the monsters inc wiki
Decoding paint brand color matching the ultimate guide


